Master Tower Defense Simulator Hard Mode with Advanced Unit Placement Strategies, Killzones, Support Buffs, and Late-Game Survival Tactics
Tower Defense Simulator is ultimately a game of efficiency. Every tile of map space matters. Every range circle matters. Every second an enemy spends inside a tower's attack radius contributes to your overall damage output.
Highlights
- Learn why tower placement often matters more than tower selection.
- Understand how to position towers based on their maximum upgrade range.
- Master hexagonal packing to fit more damage dealers inside support buffs.
- Build effective killzones around loops, intersections, and U-bends.
- Optimize Ranger, Commander, DJ Booth, and Farm placement.
- Avoid common Hard Mode mistakes such as front-loading defenses.
- Use advanced strategies like stun baiting and Commander chaining.
- Create balanced defensive layouts capable of handling bosses and leaks.
Why Placement Matters More Than Most Players Realize
One of the most overlooked mechanics in Tower Defense Simulator is damage uptime.
A tower's value isn't determined only by its damage per second (DPS). It is also determined by how long enemies remain within its attack range.
For example, an Accelerator positioned near a long loop may attack enemies for several seconds longer than an Accelerator placed beside a short straight path. Even though both towers have identical stats, the one with more attack time generates significantly more damage throughout the match.
Placement directly affects:
- Total damage dealt
- Range efficiency
- Support tower coverage
- Boss handling capability
- Space management
- Late-game survivability
Players who understand these fundamentals often outperform players with stronger loadouts simply because they extract more value from every tower on the battlefield.
Plan for Max Level, Not Level Zero
One of the Most Common Placement Mistakes
Many players begin a match by placing a Level 0 Scout, Militant, or other starter tower directly beside the track.
At first glance, this seems logical.
A Level 0 tower has a relatively small attack radius, so placing it close to enemies appears to maximize its effectiveness during the early waves.
However, this strategy creates a major problem later.
As towers receive upgrades, their attack ranges increase dramatically. A fully upgraded tower often has a much larger coverage circle than its base version.
If that tower was initially placed too close to the map edge or directly against a straight pathway, a large portion of its upgraded range ends up extending into empty, unusable space beyond the playable area.
That wasted range translates into lost damage opportunities.
The Better Approach
Before placing any tower, think about where it will stand when fully upgraded.
Instead of focusing only on its current range, visualize its Level 4 or Level 5 range circle.
Best Positioning for DPS Towers
Units such as:
- Accelerator
- Minigunner
- Golden Minigunner
- Turret
perform best when positioned slightly away from the track and centered around:
- Loops
- Intersections
- Circular paths
- U-bends
These locations allow upgraded towers to maintain coverage over multiple sections of the path simultaneously.
Best Positioning for Early-Game Towers
Early-game defenders should be placed where they can:
- Cover straight paths early
- Support future choke points
- Remain useful after upgrades
Thinking ahead prevents wasted placements and ensures every tower continues contributing throughout the match.
Master Hexagonal Packing to Maximize Space
Why Traditional Placement Wastes Valuable Room
Every TDS map contains limited space in its strongest defensive areas.
Unfortunately, many players place towers in neat square rows.
While this arrangement looks organized, it is actually inefficient.
Because tower footprints are circular, square formations create large gaps between towers. These gaps cannot be utilized effectively, resulting in wasted build space.
In Hard Mode, wasted space means fewer towers, less damage, and a greater chance of failure.
What Is Hexagonal Packing?
Hexagonal packing, often called staggered placement, is a technique that arranges towers in an offset pattern rather than a strict grid.
Instead of placing towers directly underneath one another, each new row is slightly shifted.
Example:
Tower 1 Tower 2
\ /
Tower 3
This creates a tighter formation and reduces unused space.
Why It Works
By nesting towers into the gaps created by the previous row, players can fit approximately 15% to 20% more DPS towers inside a support radius.
This becomes especially important when using:
- Commander buffs
- DJ Booth range boosts
- High-density killzones
An extra Accelerator or Minigunner inside a buffed area can dramatically increase total team damage output.
During boss fights, that additional firepower often determines whether a team secures victory or suffers defeat.
Understanding the Anatomy of a Perfect TDS Map
Every section of a map serves a different purpose.
The most successful Hard Mode players treat maps like tactical battlefields rather than simple tracks.
Let's break down the most important areas.
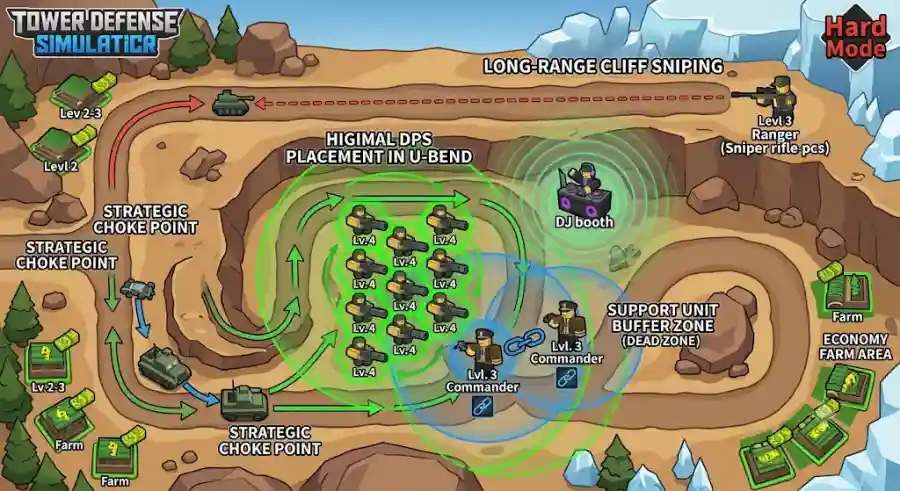
The Choke Points and U-Bends: Your Main Killzone
The Most Valuable Real Estate on the Map
Whenever a path wraps around a central section of land, enemies remain within tower range for extended periods.
These locations become natural killzones.
Since enemies spend more time exposed to attacks, these areas generate the highest possible damage output.
Best Units for Killzones
Place your primary damage dealers here:
- Accelerator
- Minigunner
- Golden Minigunner
- Turret
These towers excel when enemies stay inside their attack range for long durations.
Placement Strategy
Use hexagonal packing throughout these areas.
Stack your strongest towers together and ensure they receive support buffs from nearby Commanders and DJ Booths.
Your goal is simple:
Create a concentrated zone capable of deleting high-health enemies before they reach later sections of the track.
The Cliffs: Long-Range Control Centers
Why Rangers Thrive Here
Cliff towers occupy a unique role in Tower Defense Simulator.
Among them, Ranger remains one of the most effective long-range damage dealers available.
Its massive range allows it to attack enemies from enormous distances, but its slower firing rate means placement is crucial.
Best Ranger Placement
Avoid placing every Ranger on the first available cliff near the spawn.
Instead, spread them across:
- Central cliffs
- Rear cliffs
- Elevated positions overlooking multiple track segments
This ensures Rangers can continue targeting dangerous enemies throughout the entire map.
What Rangers Should Focus On
Properly positioned Rangers are excellent at eliminating:
- Lead Bosses
- High-health enemies
- Escaped targets
- Speedy units that bypass front defenses
Their role is often cleanup and sustained support rather than early-wave damage.
Dead Zones: The Perfect Home for Support Towers
Stop Wasting Prime Combat Space
One of the easiest ways to weaken a defense is placing non-combat towers in premium locations.
Farms, DJs, Commanders, and Medics don't need direct access to enemy paths.
Every valuable combat tile occupied by a support tower reduces your potential DPS.
Best Placement for Farms
Farms should be hidden in:
- Remote corners
- Map edges
- Unused spaces
- Areas inaccessible to combat towers
The goal is maximizing economy without sacrificing defensive positioning.
Best Placement for DJ Booth
The DJ Booth should sit slightly behind your main killzone.
This location allows its range circle to cover the maximum number of combat towers while staying out of the way.
A properly placed DJ can improve the effectiveness of nearly every major damage dealer in your setup.
Best Placement for Commanders
Commanders should remain close enough to support your DPS cluster while staying easy to monitor.
Good Commander placement simplifies ability usage and improves overall team coordination.
Avoid the Front-Loading Trap
Why Front-Loaded Defenses Fail
Watching enemies disappear immediately after spawning feels incredibly satisfying.
Because of this, many players place almost every tower near the entrance.
This strategy is known as front-loading.
Unfortunately, it becomes a major liability during Hard Mode.
Fast enemies, shielded units, and powerful bosses can eventually break through that first defensive line.
Once they do, the rest of the map becomes virtually undefended.
Hard Mode's Biggest Threats
Late-game enemies frequently possess:
- Massive health pools
- High movement speed
- Shield mechanics
- Minion-spawning abilities
Bosses such as the Fallen King and various Void Reaver variants can overwhelm front-loaded setups surprisingly quickly.
Once they push through, recovery becomes nearly impossible.
A Safer Defensive Structure
Step 1: Build Early-Wave Defense
Place a small defensive group near the front.
Its purpose is to:
- Generate cash
- Handle weak enemies
- Stabilize the early game
Step 2: Establish the Main Killzone
Create your primary defensive cluster roughly one-third to halfway through the map.
This should contain your strongest towers.
Step 3: Create Leak Protection
Reserve several powerful towers for the back half of the map.
Effective leak catchers include:
- Maxed Military Bases
- Strategically placed Pursuits
- Additional high-DPS towers
These backup defenses protect against unexpected breakthroughs.
Advanced Hard Mode Techniques
Stun Baiting
Late-game bosses often possess powerful stun attacks capable of disabling multiple towers simultaneously.
If all of your DPS towers are clustered together, a single stun can cripple your entire defense.
How Stun Baiting Works
Place inexpensive towers slightly ahead of your primary killzone.
Examples include:
- Scout
- Low-level Military Base
- Other cheap disposable units
Bosses frequently target the first tower they encounter with their stun abilities.
These low-cost units absorb the attack, protecting your expensive max-level damage dealers.
The result is uninterrupted damage output during critical boss fights.
Commander Ability Chaining
Commander remains one of the most important support towers in Tower Defense Simulator.
Its Call to Arms ability dramatically boosts nearby towers when activated correctly.
Proper Commander Placement
Place Commanders so their support circles:
- Overlap one another
- Cover your main DPS cluster
- Remain easily visible
This setup allows players to activate abilities sequentially without confusion
Why Chaining Matters
Proper Commander chaining provides near-constant offensive buffs during critical waves.
When combined with Accelerators, Rangers, and Minigunners, these buffs significantly increase team damage and improve boss-killing potential.
Hard Mode Placement Checklist
| Unit Type | Best Placement Location | Primary Goal |
|---|---|---|
| Accelerator, Minigunner, Turret | U-bends and loops | Maximize enemy exposure time |
| Ranger | Central and rear cliffs | Eliminate high-health targets |
| Farm | Map edges and corners | Preserve combat space |
| DJ Booth | Behind main killzone | Cover maximum towers |
| Commander | Near DPS clusters | Provide consistent buffs |
| Scout and Cheap Towers | In front of killzone | Absorb boss stuns |
| Military Base and Pursuit | Back-half support zones | Catch leaks and survivors |
Industry Impact: Why Strategic Placement Defines the Modern TDS Meta
Over the years, Tower Defense Simulator has evolved far beyond simple tower upgrades.
Modern TDS gameplay increasingly rewards strategic thinking, positioning knowledge, and map awareness.
Many of today's successful Hard Mode and Hardcore strategies rely less on raw tower ownership and more on efficient resource management and intelligent placement decisions.
This shift has created a deeper competitive environment where experienced players can consistently outperform others through tactical execution rather than simply possessing rare towers.
As Hardcore updates continue to raise difficulty levels, placement mastery remains one of the most valuable skills any player can develop.
Why These Strategies Matter
Every successful Hard Mode run comes down to maximizing value.
The strongest players aren't necessarily those with the rarest towers.
They're the players who:
- Understand map geometry
- Build efficient killzones
- Optimize support coverage
- Prevent wasted range
- Prepare for late-game boss mechanics
Mastering these principles transforms how you approach every TDS map and significantly increases your win rate.