Master HELLMET’s Hardest PvE Operations With Elite Team Coordination, CQB Tactics and Smart Resource Management
Whether your team is attempting to clear rooms in Decovenant or fighting through the relentless chaos of Convergence, mastering advanced squad strategies is the difference between extraction and failure. If your squad has been struggling on higher difficulty levels such as Severity or Extremity, this comprehensive guide will help you transform from a group of survivors into an elite tactical unit.
Highlights
Key Takeaways
- Build specialized squad roles instead of using identical loadouts.
- Utilize information-gathering tools before every breach.
- Master fatal funnel management and room-clearing techniques.
- Take advantage of score multipliers for faster progression.
- Capture enemies and secure civilians for maximum rewards.
- Learn how the Emissary AI Director influences missions.
- Control noise, pace, and squad stress to avoid unwanted complications.
- Prioritize teamwork and communication over individual performance.
Understanding HELLMET's Tactical Philosophy
One of the biggest mistakes new players make is treating HELLMET like a traditional shooter. Many gamers enter missions expecting fast-paced action and constant firefights. That approach rarely works.
HELLMET is fundamentally designed around tactical realism. Every bullet matters. Every decision carries consequences. Ammunition is limited, resources are valuable, and enemies can eliminate careless players almost instantly.
Unlike arcade shooters where quick reflexes solve most problems, HELLMET rewards planning. Teams that communicate effectively, move methodically, and share responsibilities consistently outperform squads that rely solely on aiming skills.
This design philosophy becomes increasingly important as players tackle advanced content and higher difficulty levels.
The Economy of War: Resource Allocation and Loadout Synergy
Why Squad Composition Matters
Before a mission even begins, your team's success is heavily influenced by decisions made in the loadout menu.
HELLMET uses a strict budget system that governs primary weapons, secondary weapons, armor, gadgets, and support equipment. New players often make the mistake of selecting expensive, self-focused loadouts that maximize personal firepower while ignoring team utility.
Experienced squads understand that victory comes from role specialization and loadout synergy.
Instead of four players trying to do everything, successful teams assign responsibilities that complement one another.
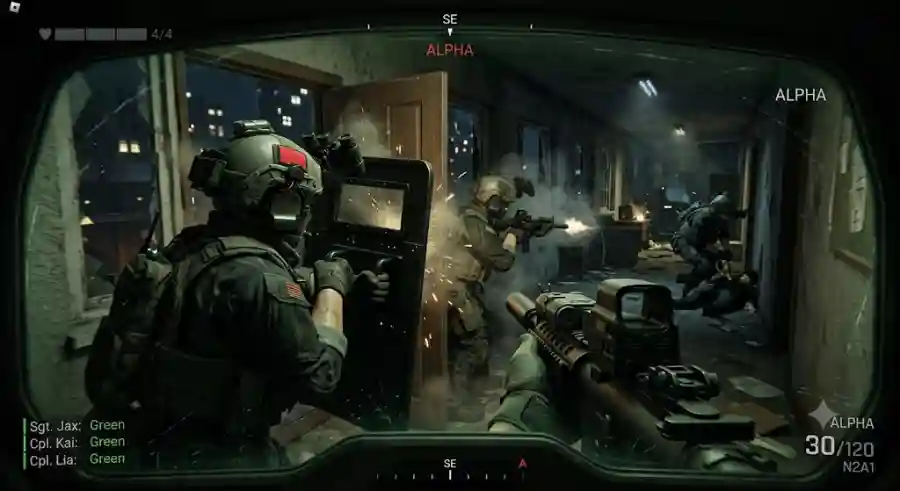
The Point Man: The Shield of the Team
The Point Man serves as the squad's frontline protector.
During breaches and room entries, this player absorbs the initial enemy attention and creates opportunities for teammates to engage safely.
Recommended Equipment
Primary and Secondary Weapons
- Dominion Shield Pistol
- N18A2 Hardkill shotgun with beanbag rounds
Gadgets
- Heavy armor plates
- Flashbang grenades
Primary Responsibilities
The Point Man performs several critical functions:
- Leads room entries
- Draws enemy fire
- Blocks dangerous choke points
- Creates safe firing lanes
- Provides physical protection for teammates
A skilled Point Man can dramatically increase a team's survivability, particularly in confined environments where enemy gunfire is concentrated.
The Intel Specialist and Breacher: The Eyes of the Squad
Information Wins Battles
Knowledge is one of the most valuable resources in HELLMET.
The Intel Specialist, often combined with the Breacher role, ensures the team enters every room with as much information as possible.
Recommended Equipment
Primary Weapons
- N2A1
- N8 ETD
Essential Gadgets
- Camera Gun
- Envoy
- Breaching Hammer
- Lockpick
Key Responsibilities
The Intel Specialist must:
- Scan rooms before entry
- Identify hostile threats
- Locate civilians
- Detect traps
- Evaluate room layouts
- Recommend entry strategies
Using a Camera Gun or Envoy before opening a door can completely change the outcome of a firefight. Entering with information gives your team a major tactical advantage.
The Support Enforcer: Delivering Firepower When It Matters
While intelligence and protection are essential, there are moments when overwhelming force becomes necessary.
That is where the Support Enforcer excels.
Recommended Weapons
- Vetala
- Kalaj 799
Both weapons deliver significant stopping power, although players must learn to control their recoil effectively.
Essential Equipment
- Additional health pens
- Extra armor plates
- Zipties for target capture
Recommended Perks
Hoarder
Provides increased gadget capacity, allowing the squad to carry more valuable resources throughout longer missions.
Scavenger
Helps maintain supplies and ensures the team remains operational during extended engagements.
Role Responsibilities
The Support Enforcer:
- Provides suppressive fire
- Eliminates high-threat targets
- Supplies teammates
- Secures captured suspects
- Supports defensive positions
When operations become chaotic, this role often determines whether a squad survives or collapses.
Advanced Room Clearing Techniques
Understanding the Fatal Funnel
One of the most important concepts in tactical shooters is the "fatal funnel."
The fatal funnel refers to the doorway or entry point where defenders naturally focus their attention. It is the most dangerous position a player can occupy during a breach.
Unfortunately, many inexperienced teams make the mistake of stacking everyone in the doorway and attempting to enter simultaneously.
This usually ends in a squad wipe.
Professional room-clearing requires discipline and structure.
The Safe Breach Sequence
A coordinated room entry follows a simple but highly effective process.
Step 1: Gather Intelligence
The Intel Specialist uses the Camera Gun to inspect the room.
This identifies:
- Enemy positions
- Civilian locations
- Potential traps
- Entry hazards
Step 2: Point Man Entry
The Shield enters first.
Immediately after crossing the threshold, the Point Man cuts left or right to secure the nearest blind corner.
Step 3: Support Follow-Up
The Support player enters behind the Shield.
Instead of following the same direction, they move opposite the Shield to establish cross-coverage and secure the room's center.
This structured approach significantly reduces casualties and increases control during close-quarters engagements.
The Powerful "Shield-and-Shoot" Strategy
Players struggling on Severity or Extremity difficulties can utilize one of the most effective cooperative tactics available.
How It Works
- The Shield operator opens the door.
- The Shield remains positioned in the doorway.
- The shield stays fully raised.
- Enemy AI locks onto the shield.
- Hostiles unload ammunition into the protected surface.
- While enemies are occupied shooting or reloading, teammates emerge from cover.
- Squad members deliver precise headshots.
Why It Works
The tactic exploits enemy targeting behavior while minimizing exposure.
Although simple, it remains one of the safest methods for handling heavily defended rooms and difficult enemy concentrations.
Mastering "Slice the Pie"
Not every situation allows the use of shields or flashbangs.
In these moments, players should rely on a classic close-quarters combat technique known as "slicing the pie."
The Process
Instead of standing directly in front of a doorway:
- Move back slightly from the entrance.
- Gradually expose small angles.
- Clear sections one at a time.
- Engage visible threats individually.
Tactical Benefits
This technique:
- Reduces exposure
- Prevents multi-directional attacks
- Creates manageable engagements
- Improves survivability
Rather than facing five enemies simultaneously, you create a series of one-on-one encounters.
That advantage often determines whether a mission succeeds or fails.
Maximizing XP, Progression, and Endgame Rewards
Understanding Score Multipliers
Progression in HELLMET depends heavily on mission performance.
Many players focus entirely on eliminations, but that approach can actually reduce overall rewards.
Advanced squads aim to maximize score multipliers instead.
No Deaths or Team Downs
Multiplier: 1.5x
Maintaining a flawless operation requires exceptional teamwork, careful movement, and disciplined engagements.
The reward is a significant increase in mission score and XP gains.
First Attempt Completion
Multiplier: 1.5x
Completing a mission without restarting provides another major bonus.
Checkpoint resets may save a run, but they eliminate this valuable multiplier.
Risk and reward are closely connected in HELLMET's progression system.
Protecting Non-Hostiles
Multiplier: 1.5x
Civilian safety plays a major role in final scoring.
Accidentally killing a non-hostile target results in a severe penalty of -250 points.
This can dramatically reduce overall mission rewards.
Securing Targets Instead of Killing
Reward: +150 points per target
Capturing enemies generates significantly better rewards than simply eliminating them.
Teams that consistently secure suspects often level faster and earn more experience.
Trigger Discipline: The Secret to Elite Scores
Identifying Threats Correctly
Missions such as Decovenant frequently present a difficult challenge.
Hostile combatants and innocent civilians may wear nearly identical clothing.
A rushed trigger pull can instantly destroy a valuable score multiplier.
Using the N18A2 Hardkill Effectively
Advanced squads often carry the N18A2 Hardkill loaded with beanbag rounds.
When used against suspicious targets:
- The target is stunned immediately.
- Fatal damage is avoided.
- Identity can be confirmed safely.
- Support players can move in quickly.
- Suspects can be intimidated and restrained.
After securing the target with zipties, the team receives substantially more points than a standard elimination would provide.
This strategy simultaneously improves rewards and reduces civilian casualties.
Managing the Emissary: HELLMET's Dynamic AI Director
What Is the Emissary?
One of HELLMET's most interesting systems operates behind the scenes.
Known as the Emissary, this dynamic AI Director constantly monitors squad behavior throughout each mission.
The Emissary evaluates:
- Stress levels
- Mission pace
- Noise generation
- Combat intensity
- Squad actions
Based on these factors, the system adjusts mission conditions dynamically.
How the Emissary Punishes Reckless Teams
When squads begin sprinting through levels, missing shots, detonating explosives, and creating excessive noise, the Emissary responds aggressively.
Potential consequences include:
- Permanently closed shortcut routes
- Additional hostile patrols
- Increased mission pressure
- Reduced tactical flexibility
- Dramatic lighting changes
- Near pitch-black environments
This creates a feedback loop where reckless behavior makes future encounters increasingly difficult.
Staying Under the Radar
Experienced players understand that controlling the Emissary is often as important as controlling enemy forces.
Keep Noise Levels Low
Using semi-automatic fire helps:
- Conserve ammunition
- Improve accuracy
- Lower the decibel meter
- Reduce unnecessary attention
Every missed burst of automatic fire contributes to escalating mission tension.
Use Checkpoints Strategically
Major checkpoints serve as important recovery zones.
When your squad reaches one:
- A distinctive audio cue plays.
- The Emissary alert state resets to "Unaware."
- Players can regroup safely.
- Resources can be redistributed.
These moments provide an opportunity to reorganize before the next phase of the operation.
Share Supplies Efficiently
Resource stations are not all equal.
Major stations provide extensive support, but smaller stations replenish only around 40% of available stock.
Because supplies remain limited, squads should prioritize teammates with the greatest need.
Smart resource sharing often determines whether a team survives the final stages of a mission.
Industry Impact: Why HELLMET Stands Out on Roblox
The success of HELLMET highlights a broader trend occurring across Roblox.
The platform is no longer dominated exclusively by casual experiences. Developers are increasingly creating sophisticated games that rival standalone releases in complexity and depth.
HELLMET showcases several modern gaming trends:
- Realistic tactical gameplay
- Cooperative PvE progression
- Dynamic AI systems
- Team-based role specialization
- High-stakes mission design
- Advanced resource management
Its popularity demonstrates that Roblox players are actively seeking deeper, more strategic experiences alongside traditional casual titles.
For fans of tactical shooters, HELLMET offers a unique experience rarely seen within the Roblox ecosystem.
Why These Strategies Matter
The hardest difficulties in HELLMET are intentionally designed to expose weak teamwork.
A squad filled with skilled individual players can still fail repeatedly if communication breaks down.
Meanwhile, a coordinated team with average mechanical skill can consistently succeed by following proven tactical principles.
The difference comes down to:
- Preparation
- Role specialization
- Information gathering
- Trigger discipline
- Resource management
- Communication
- Patience
These fundamentals form the foundation of every successful operation.